
You shouldn’t have to spend a fortune to mack out your ride. There are people out there who need to love their car on a budget. Those who are money conscious will be happy to know that you can give your car some style without flashing the big bucks. And I’m not taking about racing stripes or bumper stickers. I’m talking rims.
As an obnoxious blaster of music from the suburbs of Toronto, I’ve heard lyrics about spinnas, twenty-fours, Dayton spokes and several other forms of flashy wheel ornamentation. Is this why I wanted to deck out the rims of my first car? I don’t know. Maybe. What I do know is that something had to be done about my fifteen-year-old rims.
So I went to the internet. There is a tonne of YouTube content out there about how to paint your own rims. I wasted a lot of time slogging through hours of unedited video in order to learn about painting and auto restoration. But even that wasn’t enough to prevent me from making mistakes when I whipped out the spray cans. So I’m writing everything I’ve learned, whether it was from the web or from getting my hands dirty, into a guide that’s way easier to navigate than a video. I will admit, however, that sometimes those videos were lengthy for the right reasons. It turns out painting your own rims (the right way) is an intricate process. So this guide is a little on the long side. But that shouldn’t deter you. Just scroll through to read what you want to read, or hit Ctrl F. Also, bear in mind that I’m no expert. Everything I’ve written here is based on my first-time experience of painting my rims. Just think of me as a cave-dwelling, YouTube-hating geezer who believes that some things are best left to the written word.
A note on puttin’ in work:
Before we get down to business, I must warn you: rim restoration is a lot of work. But it’s worth it. Sure you can go to a shop and have someone else powder coat your rims, but be ready to spend anywhere between five hundred to a thousand dollars. With prices that high, you may as well just buy a whole new set of rims. This is why DIY makes much more sense. If you put in the work and do a good job, you’ll save hundreds of dollars while imbuing your rims with the same long lasting quality you’d expect from a shop. You’ll also learn a thing or two about painting and achieve mad gains for your forearms (you’ll understand in a moment). Nothing beats the satisfaction of getting the job done with your own two hands.
Let’s begin.
What you need:
1) A roll of painters tape. $3
2) Index cards. $2
3) Newspapers. $0
4) Sandpaper. $20
A lot of people think painting is about the paint. This is an honest and totally understandable assumption. But really, the majority of the work in painting projects come from priming. This is especially true when it comes to rims. Depending on how worn they are, be prepared to spend a lot of time sanding your rims down to a smooth finish.
I bought the following grit levels: 220, 400, 800, 1000. They each came in a package of 5 sheets (9” by 11”).
A note on buffing machines:
Some of you may be thinking “Hey, I’ve got a machine that can sand for me. Why should I buy paper?” Well, yes, you can use the machine on any flat, outward facing surface. But since when have rims been solid cylindrical blocks? These are modern automobiles, not Sumerian push-carts. You’re going to have get in-between the spokes and into every little nook and cranny. This is where paper rules.
5) Dishwashing Gloves. $2
6) Breathing protection. If you don’t have one of those cool gas masks, then a cloth mask will suffice. $10
7) Eye protection. You can get a decent pair of safety glasses for $10
8) Paint! You’ll need several cans of automotive spray paint. $100
2 cans of primer (227 g/8 oz each)*
3-4 cans of base coat (227 g/8 oz each)*
2 cans of high-heat clear coat (312 g/11 oz each)*

*These numbers are based on 15” rims with a five-spoke design. I had about a 1/3 can of each left to spare (which is handy for touch ups). You may need more depending on how big your rims are.
*Be sure to store your paint in an environment between 15-20 degrees Celsius.
Total estimated cost: $147
Before we get into the steps, ask yourself: are my rims mounted on the car? Or are they detached? It’s easier to work with tires that are in storage (like winter or summer tires in the off-season). If you live in warmer climes and only have one set of wheels, then you’re in for a bit of a quandary. You have three options the way I see it.
- Don’t drive your car for the duration of this project. This means you will have to leave it standing for at least two or three days (and that’s if you wake up early and work diligently).
- Call 3 friends over to help you out so you can get it done in one day.
- Complete the project over a week, or two weeks, or however long you want to push it. You’ll be driving around with scuffed rims and you’ll need to do a quick resanding of everything before you finally get to painting.
I was working on my summer rims during winter time, so I was lucky enough to have the freedom to move them around and to take my time. It took me about 2 months, in fact, because I was doing my Master’s and could only spare a couple of hours every week. And it certainly didn’t help that my rims were fifteen years old …
Step 1 – Clean your rims
Reel out your garden hose and wash them down. Pour on some soap and scrub vigorously with a brush. You will need a tough cleaning instrument, something hard and bristly, like a toilet bowl cleaner. You can even use a steel scrubber since you don’t need to worry about messing up your existing paint job. There will be a lot of road grime and brake dust, especially on the inside. If your wheels are detached, take this opportunity to flip them over and scrub out the innards.
A note on soap:
I used a “wheel degreaser” to clean my rims. It cost around $10-$12. Was this a good investment? Probably not. I have my doubts about just how necessary these cleaners are. Do you really need a separate soap just for your rims? I know rims are a big deal, but I’ve been fine just using traditional car wash soap. Either way, at this stage, feel free to throw whatever harsh cleaning chemicals you have at your rims. You’re going to be ripping up your existing paint job as part of the DIY process anyways. So don’t put as much time into thinking about which cleaner to use as I have put into this way-too-long and winding note on soap.
Step 2 – Let them dry
You can pass the time by cranking up the beats in your car speakers and dabbing on your driveway.
Step 3 – The sands of time
As someone who has painted a garage, a deck, car rims, soot-stained bedroom walls and a smoke-damaged stucco ceiling (my room survived a fire), I cannot stress enough the truth that prepping is the most important part of a painting project. The work you put in here will determine whether or not your paint job is successful in the long run. Sanding is highly repetitive and it will take a long time, but you will thank yourself when your rims are still gleaming after months and years have passed.

I mentioned grit levels earlier. The idea is to start with coarse sandpaper and work your way up to a smooth finish. This is represented by grit levels. The lower the grit level, the coarser the sandpaper.
Safety First
Before you begin, put on your glasses, put on your mask, put on your dishwashing gloves. Will you look dumb? Yes. But looking dumb is way more attractive than permanently damaging your lungs, eyes, and nails with the chemical cesspool that will be released into the air during the sanding process. Which reminds me, make sure you are working in a ventilated area. If you are not outside, then keep your garage door open.
Start with 220 grit. Tear off a piece no bigger than your own hand. Scrub vigorously over cracked, bumpy areas where heat and/or weather elements have broken apart the paint. I spent the longest amount of time with 220, probably because my rims were fifteen years old and heavily pitted. It may take several minutes to shave down one small, damaged area. Your rims may be different. Just be sure to use the coarseness of the 220 to level out the surface. Make sure you go over the less-damaged areas too. Get into every nook and cranny. If your rims are detached, be sure to rotate them to a comfortable angle. I sat on one chair and put the rim on another chair. I found this was the best option for my back. Take breaks if your forearms get tired. Don’t be discouraged while you are taking the break. Instead, feel proud that your forearms are getting jacked. Reposition your fingers along the sandpaper when you notice less friction during scrubbing. This is how you utilize the paper’s entire surface area. When your sandpaper loses its grit, discard it and rip out another piece.
If your rims are detached, take some time to flip them over and sand out the inside. You will find lots of gunk, but the surface is flat (albeit circular), so it will be much less of a hassle to sand. If your rims are designed so as to expose a large amount of the wheel well, then sanding out and painting the insides will go a long way in achieving a clean and polished look.
After you’ve sanded all four rims with the 220, repeat the process with the 400. Then repeat with 800, then 1000. It would be wise to wipe your rims with a damp cloth between each grit level. You’ll reduce the dust in your environment and you’ll accelerate the sanding process.

A note on boredom:
I thought of two things as I sat there sanding my rims. 1) Is it normal to care about rims this much? and 2) Should I multitask to keep myself entertained? I realized the answer to both questions is undoubtedly yes. So I brought my laptop outside and covered it in a clear bag (to keep it dust free). I streamed the Stanley Cup Playoffs. It was great having something to watch while I worked. You can watch something like I did or listen to music or a podcast. Sanding is monotonous. You won’t be using much brain power once you get the hang of it. Think of a way to keep yourself entertained and the experience will be much more pleasing. Otherwise you risk losing your sanity to the sands of time.
Step 4 – Clean your rims again
There will be a toxic medley of paint dust, brake dust, road tar shavings and various metal flakes all over your rims. Time to wash it away once and for all. Use water and soap. Give it a scrub to be sure that the paint you’ve sanded off is gone for good (sometimes it likes to reactivate when it’s wet). Just don’t kill yourself scrubbing. There’s no need to clean in beast mode like you did in Step 1. You’ve already gotten rid of most of the gunk and your forearms are probably tired from sanding.
Run a finger along your rims after you’ve finished cleaning. Is there a coloured residue on your skin? If yes, then you haven’t finished cleaning. Scrub again. For best results, use the “Jet” setting on your garden hose.
Step 5 – Let them dry again
You can pass the time by writing a love poem about the relationship between Man and machine or by doing the steering wheel swerve on your driveway (refer to the Ridin’ Rims music video).
Step 6 – Painting time
There they are lying on the asphalt, smooth bare-naked rims, waiting to be painted in loving strokes.
If this is the image that is going through your mind, it means you have completely lost it. Let’s finish this project so we can keep whatever sanity we have left.
Before you bust out the spray cans, take some time to consider your environment. You want a place devoid of dust, wind and sun, but you need enough ventilation to keep the air clean and breathable. I started painting on the floor in the garage, but soon realized that there was way too much dust. It was landing on my rims and sticking to the paint. So I moved them outside to the driveway. But it was far too sunny. I didn’t want my paint to haze over as it dried. So I moved to the side of my house. It was grassy but at least it was well ventilated and covered in shade. I placed a bunch of newspapers underneath the rims to save my grass from the over-spray. It went well, but I didn’t finish before nightfall. When I continued painting the next day, it was windy outside and there was a swarm of flies who sacrificed themselves to the alluring smell of my Gunmetal Metallic spray paint. I believe a few of them are still embedded in my rims, like prehistoric insects in amber. If my rims stand the test of time it will be cool to know that they’ll be valuable to paleontologists 20 million years from now.
Anyways, be sure to consider your environment. Don’t scramble from place to place like I did. Think it through and start early. The perfect environment would be an elevated table in a clean garage on a non-windy day.
A note on painting the inside of your rims:
If you’ve decided to go the DIY route, chances are that your rims are either old, the stock model, or both. If this is the case, you probably don’t need to paint the inside of your rims. But if you decide to go the extra mile, you need to consider how to prevent over-spray. Your best bet is flip your rims over so that they’re face down on the floor. Lay newspaper down flat on the inside of your rims. Seal the edges with painter’s tape so that nothing can drip down onto the forward facing part of your rims. Spray in very light strokes along the inside of the rims. The circular and vertical nature of the backside of your rims makes this area highly susceptible to running and unevenness. You may even want to stand the rim up and paint the bottom-most area section by section, rotating the wheel every few minutes as the paint dries. This strategy, however, will be very time consuming. Consider first whether or not it’s worth the extra trouble to paint the inside of your rims. When you’re done painting the insides you can start on the outsides. If all went well and there were no leaks, you can leave your taped-down newspaper as is in order to prevent over-spray from getting on the inside of your rims.
Throw some newspaper down all over your painting area. Lay your rims flat over the newspapers. Don’t stand your rims up, because that will cause the paint to run and blotch. Wipe a finger along the spokes one last time to make sure the surface is completely clean.
Get your cue cards. Place them along the edge of you rims, at the point where the tire rubber meets metal. This is to make sure the over-spray doesn’t get on your tires. If you think your cue cards will fall over, tape them together at the base so that they share their weight collectively.
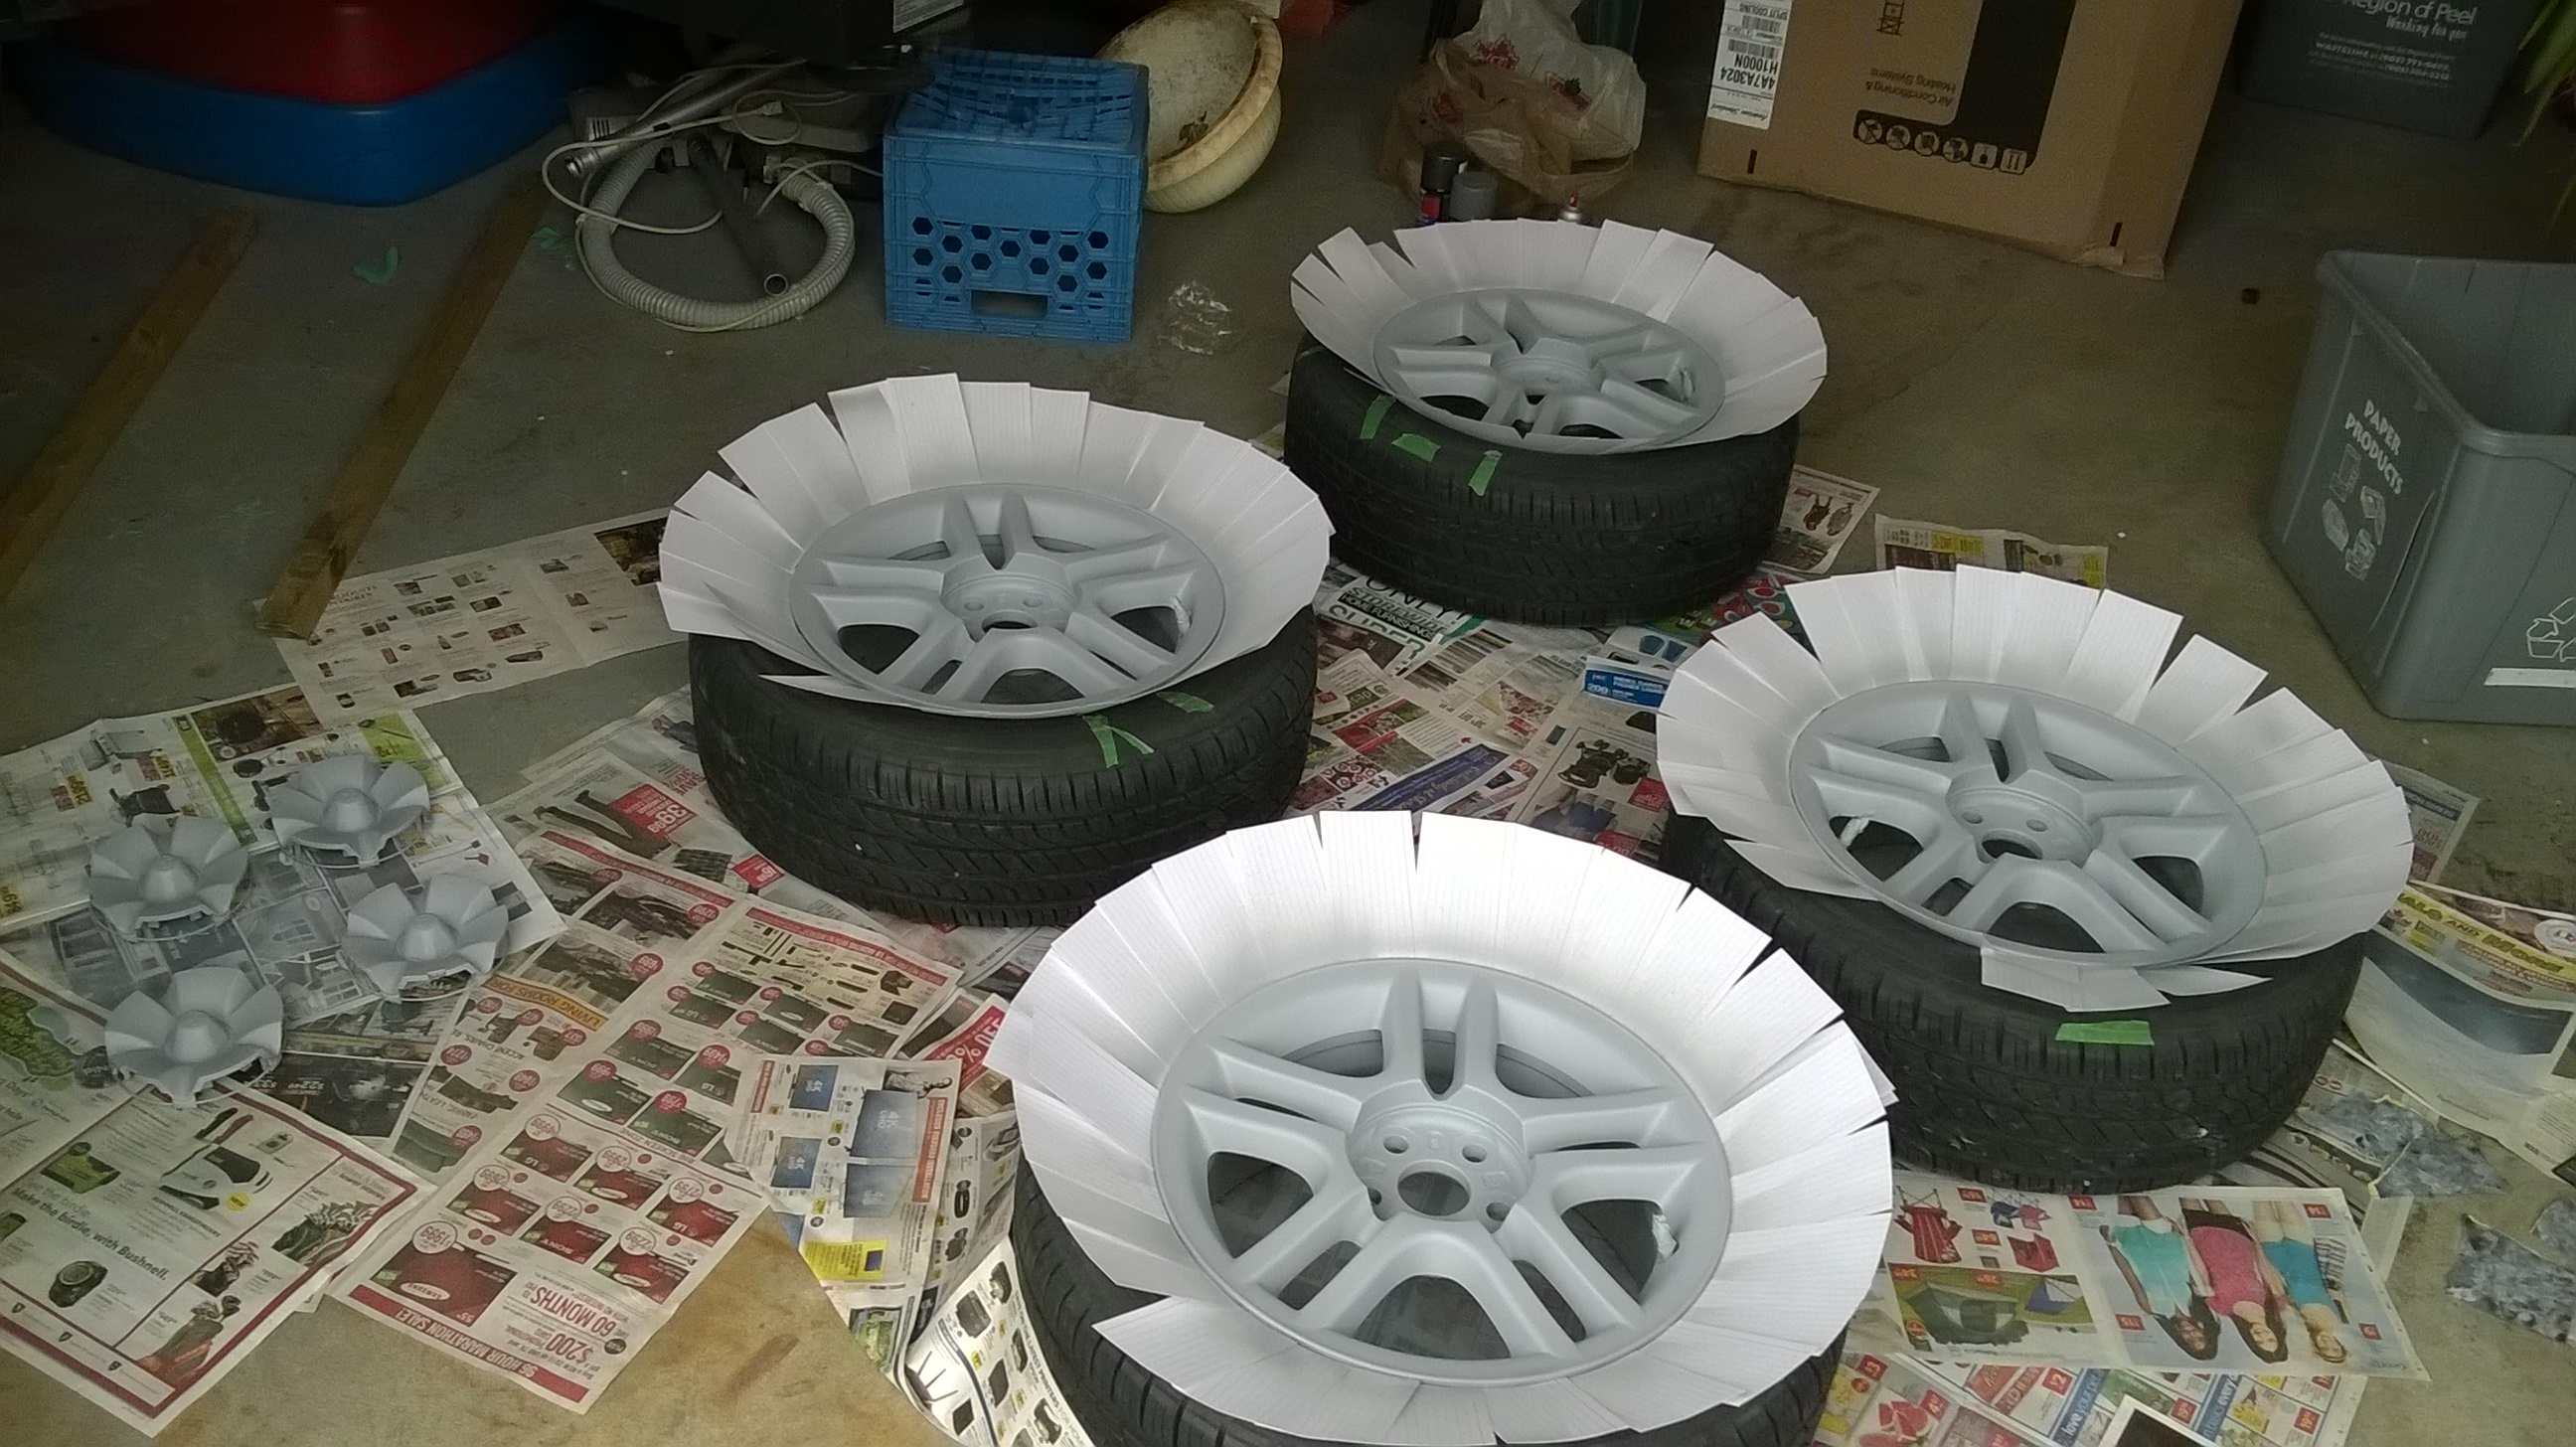
Start with your primer. Depending on the instructions on your spray can, you will likely need to shake it for at least a minute before you begin. Spray in short bursts and light even strokes from a distance of about 8-10 inches. Do a thin and light coat the first time around. Don’t try to cover everything in one go. The very first coat should be like a dusting. Think of it as the first snowfall of the season, when those little chutes of grass are poking out through the snow. Only after three of these light coats should the surface be completely covered in primer.
Keep shaking the spray can between every few strokes. Shake it a lot. Shake it enough to reassign the simile of “shake it like a polaroid picture” to “shake it like an automotive spray can.” Trust me, you don’t want blobs of paint flying out onto your rims. If this happens, you’ll be tempted to wipe it with your hands. And if you wipe it with your hands, you’ll end up smudging your paint job. Keep shaking the can and you’ll avoid going down that road.
Remember to wait ten minutes between each coat. To save time, you don’t actually have to “wait.” As the paint on one rim is drying, you can move on to the next. By the time you’ve applied one coat to all four rims, you can move back to your first rim to apply the second coat, and so on and so forth.
Let your primer dry for one hour before applying the base coat (check the instructions on your spray can to confirm). You’re basically going to repeat what you did with the primer. This time around, however, you will likely need to give each rim four coats of paint. Otherwise, the same things apply. Keep your coats light and your cans shaking.
Does it look pretty yet? Because we’re about to increase the luster. Let your base coat dry for 30 minutes before applying the clear coat. Again, the same things apply. Clear coat is important because it adds a protective layer to your base coat. Be sure to use a “high heat” clear coat intended for rims. Trust me, they will need the extra protection. It takes a lot of courage to be a rim. They have to withstand scorching heat from the friction of your brakes, along with tar, brake dust, road debris and enough spinning to drive lesser men insane.

Let your rims sit for twenty-four hours before remounting and taking them for a spin. You can pass the time by sleeping or by considering a world devoid of Mankind’s incessant need to pimp his ride.
A note on caring for your newly painted rims:
Don’t bother using wheel degreasers or other such cleaners. They are highly abrasive and are known to cause damage to custom paint jobs. Just clean them with a sponge and regular car wash soap. If your base coat doesn’t contain any metal flakes, feel free to go at it with a clay bar and some polish every few seasons. If your rim has a centre cap which can only be removed with a lever or some other sort of tool, then be sure to cover said tool with a rag in order to prevent scuffing your rims. Last but not least, be careful when parallel parking. Do not scrape the curb!
A note on why this is the “right way”:
A lot of people don’t put enough effort into sanding. A lot of people just buy spray paint marketed as “wheel paint” to avoid the task of priming and clear coating. The reality is that you can use any automotive paint as your base coat, which means you shouldn’t limit yourself to the few colour choices under the moniker of “wheel paint.” I found the colour I liked by stumbling upon the paint codes of the First Generation Chevy Camaro. That was the only way I could find the perfect shade of Gunmetal. Lastly, many people opt to paint their rims by plastidipping them. Plastidipping is convenient and I believe it has its uses, but it just doesn’t give you the same long lasting quality as a full fledged paint job. Only through sanding, priming, base coating and clear coating will your paint job last you several years.
Congratulations. You have successfully chick-magnetized your ride. This goes both ways. If you are a girl, then dudes will be impressed, probably more than if it were the other way around, to be quite honest. Take a look at your car when you drive by a highly reflective glass building. You will be surprised by how boss you look. Just don’t stare at your reflection for too long. Imagine explaining to the collision reporting centre that you crashed due to your vanity and your completely irrational love of rims.
Leave a Reply